
Energy Efficiency and Insulation Standards
Ever notice how some basements feel like refrigerators even in summer? Or saunas in winter? That's the result of poor insulation—and it's the first thing your potential tenants will feel (even if they can't name the problem).
flowchart TB
    InsulationStandards["Basement Insulation Standards"]

    InsulationStandards --> ClimateZones["Climate Zone Requirements"]
    InsulationStandards --> AdvancedOptions["Advanced Insulation Options"]
    InsulationStandards --> ThermalFactors["Thermal Performance Factors"]

    ClimateZones --> Zone3["Zone 3
    R-5 Sheathing or
    R-13 Batt"]

    ClimateZones --> Zone4AB["Zones 4A & 4B
    R-10 Sheathing or
    R-13 Batt"]

    ClimateZones --> Zone4C5["Zones 4C & 5-8
    R-15 Sheathing or
    R-19 Batt"]

    AdvancedOptions --> ICF["Insulated Concrete Forms
    R-23+ Value
    Exceeds All Requirements"]

    AdvancedOptions --> ContinuousInsulation["Continuous Insulation
    Prevents Thermal Bridging"]

    ThermalFactors --> ThermalBreak["Thermal Break
    R-5 Rigid Board Between
    Concrete & Slab"]

    ThermalFactors --> InstallationQuality["Installation Quality
    Affects Overall Performance
    Avoid Gaps & Compression"]

    ThermalFactors --> AdditiveLayers["Multi-Layer Systems
    R-Values Are Additive"]

    style InsulationStandards fill:#f9f,stroke:#333,stroke-width:2px
    style ClimateZones fill:#bbf,stroke:#333,stroke-width:1px
    style AdvancedOptions fill:#fbb,stroke:#333,stroke-width:1px
    style ThermalFactors fill:#bfb,stroke:#333,stroke-width:1px
Energy efficiency isn't just about comfort—it directly impacts your tenant's utility bills and your ability to maintain competitive rental rates.
So what makes a properly insulated basement? Let's break it down.
Recommended Basement Wall Insulation R-Values by Climate Zone
The International Energy Conservation Code (IECC) doesn't just suggest insulation levels—it prescribes them based on climate zones, acknowledging the obvious fact that Miami and Minneapolis have drastically different thermal needs.
According to the 2021 IECC Residential Provisions, here's your insulation cheat sheet:
- Zone 3: You'll need R-5 insulative wall sheathing or R-13 batt insulation
- Zones 4A and 4B: Step up to R-10 for sheathing or stick with R-13 for batt
- Zones 4C and 5 through 8: Increase to R-15 for sheathing or R-19 for batt insulation
Why such specific numbers? Because these requirements reflect real-world temperature extremes that demand tailored approaches for both comfort and energy efficiency.
Earlier versions of the code offered different compliance paths. The 2018 IECC, for instance, allowed R-15 continuous insulation on either interior or exterior basement walls in certain zones, or R-19 cavity insulation on the interior.
The 2021 update introduced another option for colder climates (zones 5-8 and Marine 4): a combo approach using interior R-13 insulation with exterior R-4 insulation.
These evolving requirements aren't arbitrary bureaucracy—they reflect advancements in building science and the push toward greater energy efficiency. Always check your local codes for the most current requirements in your specific location.
Insulation Standards from ASHRAE and Advanced Insulation Options
Beyond the IECC, there's ASHRAE (American Society of Heating, Refrigerating and Air-Conditioning Engineers). Their Standard 90.1 primarily targets commercial buildings, but often influences residential codes too.
Some building materials simply blow past minimum requirements across all climate zones. Take Insulated Concrete Forms (ICFs) for example—products like Fox Blocks ICFs deliver an impressive R-value of 23, outperforming ASHRAE 90.1 minimums everywhere.
Is exceeding minimum code requirements worth the cost? Often, yes. Higher R-values translate to enhanced energy efficiency, improved comfort, and potentially significant savings on heating and cooling costs over time.
"Continuous insulation" deserves special attention in your planning. Why? Because it addresses thermal bridging—essentially heat highways that bypass your insulation through more conductive structural elements like wood or metal framing.
Without addressing this issue, your actual energy performance can fall well short of what your insulation rating suggests on paper.
In some interior insulation scenarios, you'll need a thermal break (like an R-5 rigid board) between the concrete wall and the slab to prevent heat transfer through these conductive materials.
Remember that R-value measures resistance to heat flow—higher numbers mean better insulation. In multi-layered systems, the individual R-values add up, but their effectiveness hinges on installation quality.
Gaps, compression, or improper techniques can dramatically reduce performance. For instance, stuffing batt insulation rated for a specific thickness into a thinner cavity compresses the material and significantly reduces its effective R-value.
The best insulation on paper won't perform if it's installed incorrectly. This is one area where professional installation often pays for itself many times over.
Types of Insulation Materials and Moisture Considerations
Basements present unique insulation challenges that upper floors don't face. Why? One word: moisture.
That concrete box is essentially surrounded by damp soil, creating humidity conditions that can rapidly transform your insulation investment into a moldy mess if you choose the wrong materials.
So what are your options, and how do they stack up?
Rigid foam boards come in several flavors, each with distinct advantages:
- Extruded Polystyrene (XPS): Those pink or blue boards offer excellent moisture resistance and consistent R-values (typically R-5 per inch).
- Expanded Polystyrene (EPS): The white beaded boards cost less but deliver slightly lower R-value per inch (around R-4). They're also slightly more vulnerable to moisture.
- Polyisocyanurate (Polyiso): These typically aluminum-faced boards provide the highest R-value per inch (R-6 to R-8) of rigid foams, though performance can decrease in extreme cold.
Batt insulation (fiberglass or mineral wool) remains popular due to its affordability and familiar installation between framing studs. But here's the catch: it performs poorly when damp and requires perfect installation for rated performance.
Mineral wool offers better moisture resistance than fiberglass, making it the preferred batt option for basement applications.
Spray foam insulation delivers excellent air sealing capabilities in two varieties:
- Closed-cell: Higher R-value (R-6 to R-7 per inch) and excellent moisture resistance
- Open-cell: Lower cost but less moisture resistant (R-3.5 to R-3.7 per inch)
Here's an important caveat with closed-cell spray foam: some experts raise concerns about its potential to trap moisture against concrete walls. Unlike some other materials, it creates a vapor barrier that allows no drying toward the interior.
So what's the ideal approach? Many professionals recommend a hybrid strategy: apply rigid foam board directly against concrete walls for moisture protection, then construct a stud wall with batt insulation in the cavities.
This combination leverages the moisture resistance of foam while utilizing the cost-effectiveness of batts.
Your basement's specific conditions should guide your material selection. Does your basement show signs of dampness? Does your region experience extreme temperature swings? These factors should steer your choices to ensure long-term performance.
Remember: mold issues can quickly turn your investment into a liability, affecting not just the basement suite but potentially the entire home.
Construction Costs and Considerations
"How much will this basement conversion actually cost me?"
It's probably the first question you've asked—and the toughest to answer precisely. The range is substantial, influenced by your vision, material choices, local labor costs, and existing conditions.
Let's get real about what you're looking at financially.
Established Cost Ranges Per Square Foot for Basement Finishing Projects
Basement projects typically fall into three distinct tiers:
flowchart TB
    BasementSuite["Basement Suite\nTotal Cost Range: $15-$300/sq ft"]

    BasementSuite --> BasicCosts["Basic Construction\n$15-$30/sq ft"]
    BasementSuite --> MidRangeCosts["Mid-Range Finishes\n$30-$75/sq ft"]
    BasementSuite --> HighEndCosts["High-End Finishes\n$75-$300+/sq ft"]

    BasicCosts --> FramingBasic["Framing & Drywall\n$3-$8/sq ft"]
    BasicCosts --> LaminateFlooring["Laminate Flooring\n$1.50-$5/sq ft"]
    BasicCosts --> BasicFixtures["Basic Fixtures\n$800-$2,000"]

    MidRangeCosts --> TileFlooring["Tile Flooring\n$10-$25/sq ft"]
    MidRangeCosts --> CustomFeatures["Custom Features\nVariable"]
    MidRangeCosts --> MidRangeFixtures["Better Fixtures\nVariable"]

    HighEndCosts --> HardwoodFlooring["Hardwood Flooring\nPremium"]
    HighEndCosts --> GraniteCounters["Granite Countertops\nPremium"]
    HighEndCosts --> LuxuryFixtures["Luxury Fixtures\nPremium"]

    subgraph "Essential Amenities"
        Bathroom["Bathroom\n$3,000-$50,000"]
        Kitchenette["Kitchenette\n$9,750-$45,000"]
    end

    Bathroom --> PlumbingRough["Plumbing Rough-In\n$500-$20,000"]
    Bathroom --> BathroomFixtures["Fixtures\n$2,300-$8,800+"]

    Kitchenette --> Appliances["Appliances\n$1,000-$10,000+"]
    Kitchenette --> CabinetryCounters["Cabinetry & Counters\n$500-$20,000+"]

    Permits["Permitting Fees\n$500-$2,000"] --- BasementSuite

    style BasementSuite fill:#f9f,stroke:#333,stroke-width:2px
    style Bathroom fill:#bbf,stroke:#333,stroke-width:1px
    style Kitchenette fill:#bbf,stroke:#333,stroke-width:1px
    style Permits fill:#fbb,stroke:#333,stroke-width:1px
Basic Finish ($15-$30 per square foot): Think drywall, laminate flooring, simple lighting, and minimal built-ins. This gets you a functional space without many extras—perfectly adequate for many rental situations.
Mid-Range Remodel ($30-$75 per square foot): This level incorporates better quality materials like tile flooring, upgraded cabinetry, recessed lighting, and some custom features. Most basement suite projects land in this category.
High-End Transformation ($75-$300+ per square foot): Premium finishes including granite countertops, hardwood floors, elaborate built-ins, and high-end fixtures. This approach makes sense primarily for luxury properties where rental rates can justify the investment.
The total cost for basement projects varies dramatically, with averages often cited around $32,000. But the real range spans from as little as $2,800 for DIY minimalists to $100,000+ for premium living spaces.
Why such enormous variation? Some projects involve significant structural work or even building the basement from scratch, exponentially increasing costs. Your starting point matters enormously.
Breakdown of Typical Costs for Key Construction Components
To help you create a more customized budget, let's dissect the costs by component:
Framing and Drywall: Expect $3-$8 per square foot. Wood framing runs $3-$5 per square foot, while steel framing costs slightly more at $4-$7.
Drywall itself costs just $0.50-$1 per square foot for materials, but professional installation adds another $1-$2 per square foot for hanging and finishing.
Flooring options span a wide price range:
- Laminate: $1.50-$5 per square foot
- Luxury vinyl plank: $3-$8 per square foot
- Porcelain tile: $10-$25 per square foot
- Carpet tiles: $1-$3 per square foot
Lighting often becomes a surprisingly significant expense, typically ranging from $800-$2,000 for the entire basement. Good lighting is crucial in basement spaces that lack natural light—this isn't where you want to cut corners.
HVAC ductwork installation runs $10-$20 per linear foot, while paint costs $15-$40 per gallon.
Understanding these component costs lets you make strategic decisions. Maybe you splurge on quality insulation but save with laminate flooring, or invest in excellent lighting but choose more modest fixtures.
Cost Considerations for Adding Essential Amenities
Bathrooms
Adding a bathroom dramatically impacts both project complexity and rental value.
The price range is enormous—from $3,000 for a basic DIY setup to over $50,000 for a high-end professional installation with premium fixtures.
Most homeowners spend between $5,000-$15,000 for a professionally installed basement bathroom.
Why such variation? Plumbing rough-in costs can range from $500 to $20,000 depending on your existing setup. If your basement sits below the main sewer line (as many do), you'll likely need specialized systems like upflush toilets or sewage ejector pumps—significantly increasing costs.
Individual fixtures add up quickly:
- Toilets: $400-$800+
- Sinks: $400-$1,000+
- Showers or tubs: $1,500-$7,000+
A bathroom addition requires careful planning due to the complexity of plumbing and electrical work. Getting this right the first time prevents enormous headaches later.
Kitchenettes
Want to maximize rental income? Include food preparation capabilities.
A kitchenette typically costs between $9,750-$45,000, depending on features and finish level. A smaller, basic setup runs $9,750-$19,500, while a standard basement kitchen suitable for full meal preparation ranges from $20,000-$45,000.
Appliances make up a substantial portion of this cost—from $1,000 for basic models to over $10,000 for high-end versions. Cabinets and countertops add another $500-$20,000+ depending on materials and customization.
Plumbing for a kitchenette adds $1,000-$4,000 or more to your total.
Like bathrooms, kitchenettes require careful planning for plumbing and electrical requirements. Your choices directly impact both functionality and aesthetic appeal.
RSMeans Basement Finishing Costs
Looking for more precise estimates? Many professionals use RSMeans data, construction's most trusted cost database.
According to their analysis, typical basement remodeling runs $109.93-$174.67 per square foot, depending on finishes and features.
RSMeans offers an online platform where you can create customized estimates based on their extensive pre-built models. These include detailed breakdowns of assembly costs, allowing you to analyze different construction types and materials.
The platform lets you specify building types, square footage, number of stories, and add specific components to generate localized projections tailored to your area.
This approach provides more current and location-specific cost information than national averages, helping you develop more accurate budgets for your project.
Egress Requirements for Safety and Compliance
What if there's a fire? How will your tenants escape a basement in an emergency?
This isn't just a hypothetical scenario—it's the exact question building codes address with egress requirements. These aren't optional suggestions; they're non-negotiable safety standards that could literally save lives.
Let's break down what you need to know.
Overview of International Residential Code (IRC) Requirements
The International Residential Code (IRC) provides the standard that governs egress requirements across most of the United States.
The fundamental requirement is straightforward: basements with habitable space—especially sleeping rooms—must have at least one operable emergency escape and rescue opening (EERO) that leads directly outside.
Why? In case of fire or other emergency, occupants need a reliable escape route, and emergency responders need a way to enter.
For basements containing bedrooms, each sleeping room typically requires its own dedicated EERO. This ensures everyone has a direct path to safety, regardless of where they are when emergency strikes.
This isn't about bureaucratic red tape—it's about preventing tragedies. In a fire, seconds matter.
Specific Dimensional Requirements for Egress Windows
Size matters tremendously when it comes to egress windows. The IRC specifies precise minimum dimensions designed to allow both escape and rescue operations.
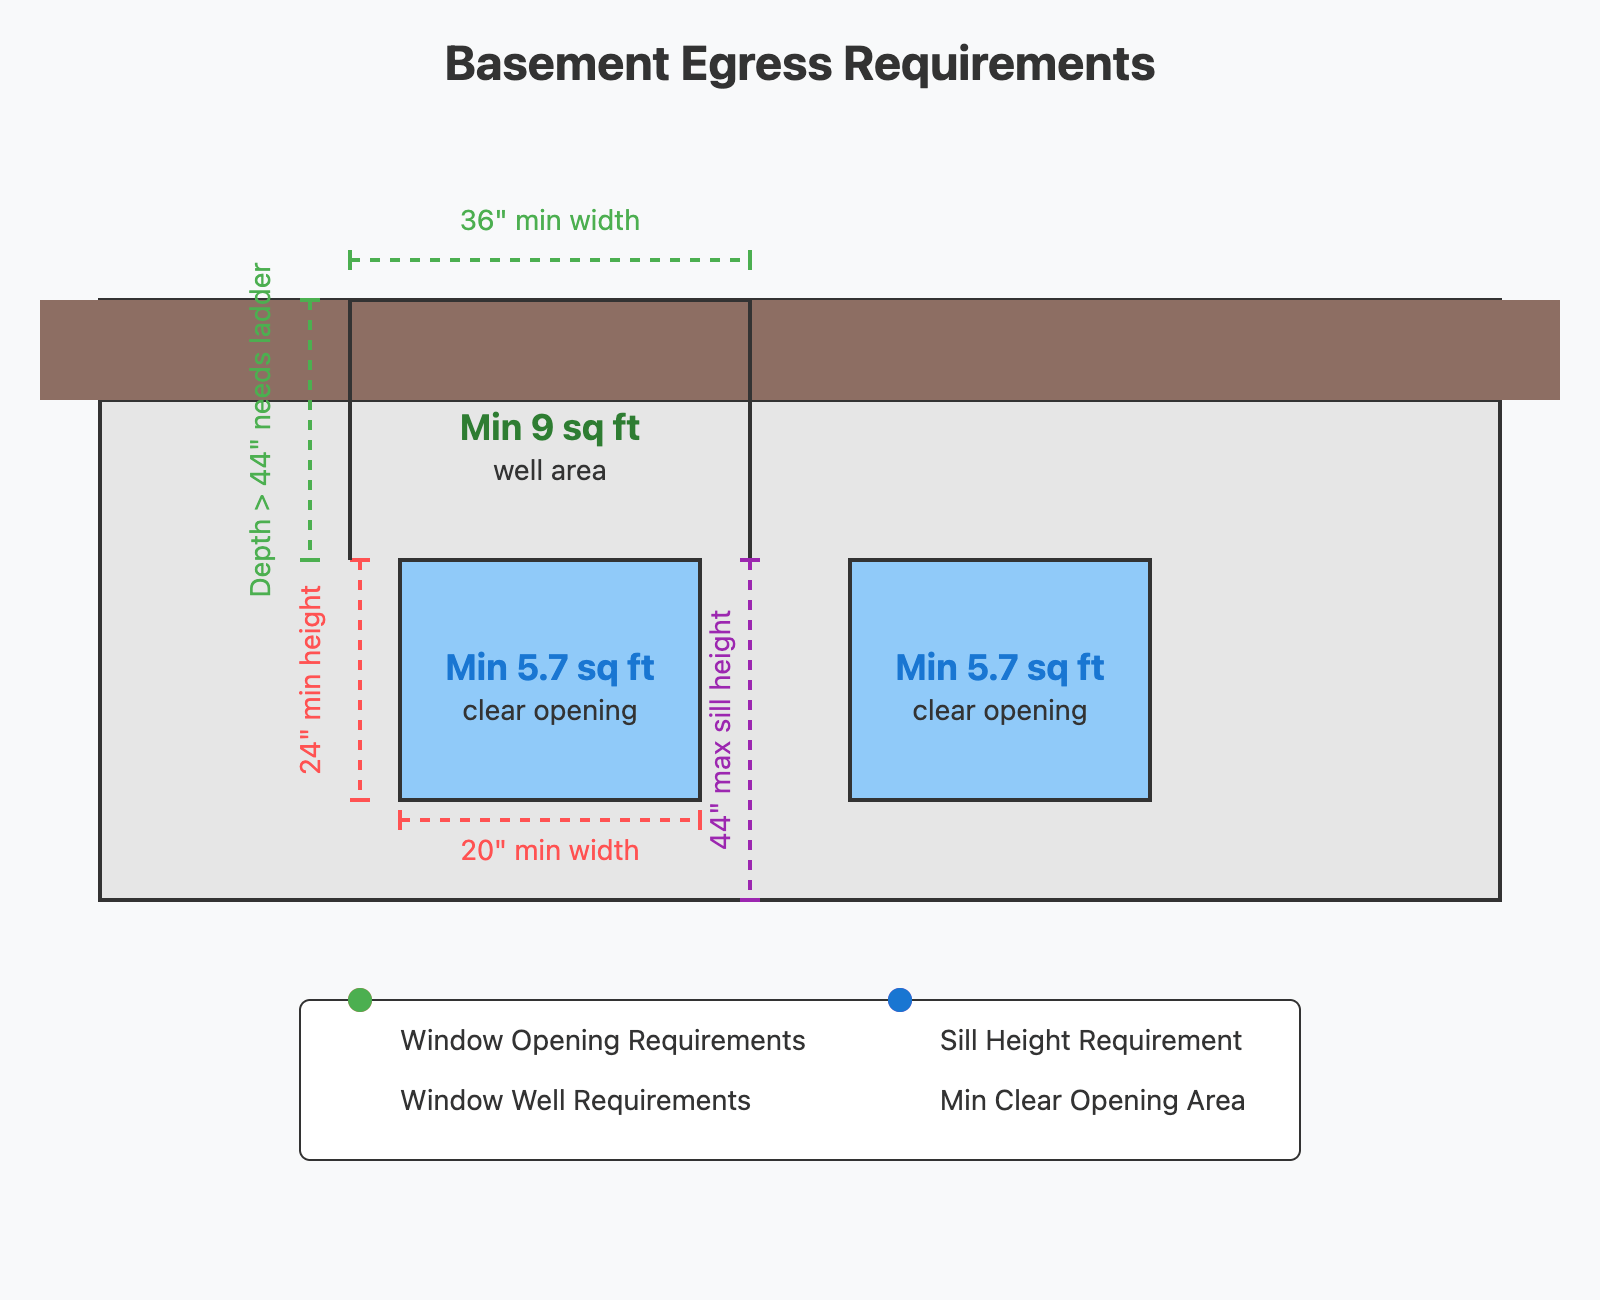
The minimum net clear opening area for an egress window is 5.7 square feet—enough space for a fully-equipped firefighter to enter.
There's a slight exception for grade-floor or below-grade openings, which can have a minimum net clear opening of 5 square feet.
Additionally, the window must have:
- A minimum net clear opening height of 24 inches
- A minimum net clear opening width of 20 inches
- The bottom of the opening (sill height) no more than 44 inches above the finished floor
Would you be able to climb through your planned window opening in the dark, possibly with smoke in the room? That's the real-world test these dimensions address.
These emergency escape openings must be operational from inside without keys, tools, or special knowledge. In an emergency, fumbling with complex mechanisms isn't an option.
The Role of Window Wells
If your egress window sits below ground level (as most basement windows do), you'll need a window well to provide the necessary space for egress.
The window well must have:
- A minimum horizontal area of 9 square feet
- A minimum horizontal projection and width of 36 inches
For deeper window wells (exceeding 44 inches in depth), you must install a permanently affixed ladder or steps that remain usable when the window is fully open.
Why these specific dimensions? They ensure someone can actually exit through the window and have enough space to maneuver within the well.
Any covers or grates over the window well must be easily opened or removed from the inside without special tools. Again, this ensures they don't become obstacles during an emergency evacuation.
General Requirements for Egress Doors
While windows are common egress solutions for basements, doors providing direct exterior access can also serve this purpose if they meet specific requirements.
An egress door typically needs:
- A minimum clear width of 32 inches when open at 90 degrees
- A minimum clear height of 78 to 80 inches (depending on specific code and dwelling type)
- Side-hinged design or slider functionality
Interestingly, in dwellings with automatic fire sprinkler systems, there's sometimes flexibility in the requirements. The need for an EERO in a basement sleeping room might be waived if the basement has a second means of egress or an emergency escape opening.
This highlights how fire suppression systems can sometimes provide alternative safety measures that influence specific egress requirements. However, always verify these exceptions with local building authorities before implementation.
Remember: these requirements aren't suggestions—they're mandatory. Meeting them isn't just about code compliance; it's about ensuring your tenants can escape safely in an emergency.
Soundproofing for Comfortable Living
Ever lived beneath a family with young children? Or above tenants who enjoy late-night Netflix marathons at theater volume?
flowchart TB
    Soundproofing["Basement Soundproofing"]

    Soundproofing --> SoundproofingTechniques["Soundproofing Techniques"]
    Soundproofing --> STCRatings["STC Ratings"]

    SoundproofingTechniques --> Insulation["Sound-Absorbing Insulation
    Mineral Wool Outperforms Fiberglass"]

    SoundproofingTechniques --> Decoupling["Decoupling
    Resilient Channels/Clips
    Prevents Vibration Transfer"]

    SoundproofingTechniques --> SpecializedDrywall["Sound-Rated Drywall
    Denser & Thicker
    Better Sound Blocking"]

    SoundproofingTechniques --> SealingGaps["Sealing Gaps & Cracks
    Acoustic Sealant
    Blocks Sound Pathways"]

    SoundproofingTechniques --> DoorSelection["Solid-Core Doors
    With Perimeter Seals"]

    SoundproofingTechniques --> Flooring["Sound-Dampening Underlayment
    Reduces Impact Noise"]

    SoundproofingTechniques --> WallConstruction["ICF Construction
    Achieves STC 50+"]

    STCRatings --> STC25["STC 25
    Normal Speech Easily Heard"]

    STCRatings --> STC30["STC 30
    Loud Speech Comprehensible"]

    STCRatings --> STC35["STC 35
    Loud Speech Audible But Not Intelligible"]

    STCRatings --> STC40["STC 40
    Shouting Can Be Heard But Not Understood"]

    STCRatings --> STC45["STC 45
    Shouting Faintly Audible"]

    STCRatings --> STC50["STC 50+
    Loud Sounds Mostly Inaudible
    Ideal Between Living Units"]

    style Soundproofing fill:#f9f,stroke:#333,stroke-width:2px
    style SoundproofingTechniques fill:#bbf,stroke:#333,stroke-width:1px
    style STCRatings fill:#bfb,stroke:#333,stroke-width:1px
    style STC50 fill:#bfb,stroke:#333,stroke-width:2px
Sound isolation isn't just a luxury—it's essential for harmonious living in multi-unit properties. The last thing you want is tension between you and your tenants over noise complaints.
Common Soundproofing Techniques and Materials
Several key strategies can dramatically improve sound isolation between your main living area and the basement suite:
Strategic insulation placement makes a significant difference. Mineral wool outperforms standard fiberglass for sound dampening, absorbing sound waves that would otherwise transmit through walls and ceilings.
Decoupling might be the single most effective technique for serious soundproofing. What does it mean? Essentially, creating a physical separation between drywall and framing using resilient channels or clips.
Think of it as adding shock absorbers to your walls—vibrations can't travel as easily when the surfaces aren't directly connected.
Sound-rated drywall costs more than standard options but delivers substantial acoustic benefits. Products like QuietRock contain sound-damping materials within their core, dramatically outperforming standard drywall of similar thickness.
Don't overlook the small stuff: sealing gaps and cracks with acoustic sealant. Sound behaves like water—it finds and flows through the path of least resistance. Even tiny gaps can significantly compromise otherwise excellent soundproofing.
Door selection matters enormously. Solid-core doors with quality perimeter seals dramatically outperform hollow-core options for sound blocking. This relatively simple upgrade pays acoustic dividends far beyond its cost.
For flooring, sound-dampening underlayment beneath your finished floor reduces impact noise—particularly important for footfall sounds traveling between floors. These specialized underlayments absorb vibrations before they can transfer to the structure.
The basement walls themselves significantly impact sound isolation. Insulated Concrete Forms (ICFs) deliver exceptional sound reduction, often achieving Sound Transmission Class (STC) ratings above 50—considered excellent for residential construction.
Explanation of Sound Transmission Class (STC) Ratings
STC ratings might seem like abstract numbers, but they translate directly to real-world experiences:
STC 25: Normal conversation easily passes through walls—you can understand almost everything. This is typical of basic interior walls with a single layer of drywall on each side.
STC 30: Loud speech remains fairly comprehensible. You might not catch every word, but you'll follow the conversation.
STC 35: Loud speech becomes audible but not fully intelligible. You can tell someone's talking, but catching specific words becomes difficult.
STC 40: Shouting can be heard but not easily understood. Music and loud TV sounds are audible but muffled.
STC 45: Shouting becomes faintly audible—you might hear it, but not clearly enough to follow a conversation.
STC 50+: Even loud sounds become mostly inaudible. This is the benchmark for proper sound isolation between separate living units.
The STC 50+ rating achieved by ICFs represents excellent sound isolation—loud sounds from either side of the wall would be significantly diminished, creating the privacy both you and your tenants desire.
Understanding these ratings helps set realistic expectations. If you're aiming for "I can't hear anything" with basic insulation and standard drywall (STC 30-35), you'll be disappointed.
The most effective soundproofing approaches combine multiple strategies—decoupling, mass, absorption, and damping—rather than relying on any single technique.
For basement suites, focus particularly on ceiling soundproofing, as footfall impact noise from above tends to be the most noticeable and disruptive sound for basement dwellers.
Permitting Fees and Regulatory Landscape
That stack of permit applications might seem like bureaucratic busywork, but they serve a crucial purpose: ensuring your basement suite is safe, legal, and built to last.
They also come with fees that need factoring into your project budget. Let's break down what you're looking at.
General Ranges for Permitting Fees
Permit costs vary significantly depending on your location, project size, and complexity. Generally, expect to pay between $500 and $2,000 for the necessary paperwork.
Some municipalities calculate fees as a percentage of your total construction cost—typically between 0.5% and 2.0%. Others use a tiered system based on square footage:
- Small basement remodel (up to 250 sq ft): $250 to $500
- Medium remodel (250-750 sq ft): $500 to $1,000
- Large remodel (750-1,500 sq ft): $1,000 to $2,000
What exactly are you paying for? These fees cover plan reviews, multiple inspections during construction phases, and final approval. Think of them less as a tax and more as quality assurance—professional eyes verifying that critical systems like electrical and plumbing are installed safely.
Is there a way around these fees? Technically yes, but the risks far outweigh any short-term savings.
Importance of Adhering to Local Building Codes and Regulations
While this guide provides general standards, your local building codes have the final say. Always consult and follow your specific local regulations—they supersede any general guidelines.
Permits are typically required for significant renovations, especially those involving:
- Structural changes
- Electrical wiring installation or modification
- Plumbing system alterations
- Creating habitable space in previously unfinished areas
What happens if you skip permits? The consequences extend far beyond potential fines:
- Insurance may deny claims for unpermitted work
- Selling your property becomes complicated when buyers discover unpermitted renovations
- You might be forced to remove completed work entirely
- Safety issues could arise from uninspected electrical or structural changes
Compliance with building codes isn't just about avoiding trouble—it ensures your basement suite is safe for occupants and structurally sound for the long term.
Examples of work typically requiring permits include:
- Adding insulation
- Installing new HVAC ductwork
- Performing electrical wiring
- Installing egress windows
- Finishing basements
- Altering foundations
- Reworking plumbing systems
When in doubt, check with your local building department. Many offer pre-application consultations that can save you significant trouble down the road.
Remember: trying to fly under the radar might seem tempting, but the potential consequences—financial, legal, and safety-related—make proper permitting the only sensible approach.
Rental Income Potential and Property Value
The million-dollar question: "How much can I actually make from this basement suite?"
While the costs are concrete and predictable, the income potential shows much more variability. Let's examine what factors influence your return on investment.
Typical Ranges for Potential Rental Income
The rental income potential for your basement suite depends on numerous factors that fluctuate with market conditions.
What brings $700 monthly in rural Idaho might command $2,500 in Seattle or Boston. Location isn't just a factor—it's often the dominant variable in the rental equation.
Beyond location, what drives rental value?
Size matters, obviously. But amenities often matter more. A well-designed 600-square-foot suite with private entrance, ample natural light, and a proper kitchenette might outperform a larger but more basic space.
Some investors estimate potential income as a percentage of property value, but even this approach varies significantly by market. Others calculate based on square footage, but again, the same square footage commands wildly different rents across markets.
Your best approach? Analyze comparable rental properties within a 1-2 mile radius. Look specifically at:
- Number of bedrooms and bathrooms
- Inclusion of kitchenette vs. full kitchen
- Private entrance availability
- Access to amenities like laundry facilities
- Quality of finishes
These factors will help you establish realistic rental expectations for your specific market.
Remember: promising top-tier amenities but delivering basics creates unhappy tenants. Better to accurately represent your space and attract tenants whose expectations align with what you're offering.
Consideration of How Basement Square Footage is Viewed in Real Estate Appraisals
Here's something that surprises many first-time basement developers: even when fully finished and legally converted to a suite, basement square footage typically isn't included in the official "above-grade" or "gross living area" (GLA) calculation used by appraisers and in Multiple Listing Service (MLS) listings.
Why this distinction? Appraisal standards differentiate between above-grade and below-grade living spaces due to factors like natural light, ventilation, and potential moisture issues.
Local regulations and real estate customs vary—in some markets, finished basements might be included in total square footage calculations. Check your local practices to understand how your basement will be counted.
Does this mean your investment won't increase property value? Not at all.
Despite often being excluded from official square footage, a well-finished, code-compliant basement suite can significantly increase your property's market value and appeal.
Buyers and renters value the additional living space and income potential, making your basement suite a valuable asset regardless of square footage classification.
The real value isn't just in how space is counted—it's in the functionality, income potential, and additional living options your basement suite provides.
Many property owners find their basement conversion delivers returns both through direct rental income and through increased property value—especially in markets with housing shortages where additional units are highly prized.
Conclusion
Is that basement suite worth the investment? The numbers suggest yes.
Done right, basement conversions deliver on multiple fronts: they create housing where it's needed most, generate steady income, and build long-term equity.
The keys to success lie in the details. Select proper insulation for your climate zone. Install egress systems that ensure safety. Implement soundproofing that prevents tenant conflicts before they start.
Permits and inspections aren't just bureaucratic hurdles—they're quality assurance measures protecting both you and your future tenants.
While rental income varies by market, a well-executed basement suite typically enhances property value beyond its cost, creating both immediate cash flow and long-term appreciation.
That "wasted space" beneath your feet? It might just become your home's most valuable asset.

FAQ
Basement Suite Strategy: 7 Essential Steps for Profitable Conversion Solutions Tailored to Real Life 🧮

The Numbers Don't Lie:
Why People Actually Use Ultimate Calculators
We built these tools because we got tired of calculators that either oversimplify the math or make you feel like you need an engineering degree to get an answer. Whether you're planning a project or just trying to figure out what something will cost, our calculators give you the straight numbers without the runaround.
Real Reviews From Real Humans
"Finally, a calculator that doesn't make me guess what half the fields mean. Got my answer in 30 seconds."

100% Free Calculations
Our math works, our prices don't
24/7 Calculator Access
Crunch numbers whenever you need
100% Accurate Results
We double-check our math so you don't have to